Tag

pilaf

Browsing

My husband calls from his office at the Indian Air Force Headquarters, where he has been transferred. A colleague and his wife are driving in from Chandigarh and have an early morning flight from New Delhi. They have asked to stay with us overnight.

The armed services are a close-knit community, and you help each other whenever needed.

I take stock of dinner. Rosy (our cook) has already fixed the evening’s planned meat curry and sabzi. She will make fresh rotis when we are ready to eat. I decide to add a quick vegetable pilaf. Along with raita, pickles, and kuchumbar (Indian salsa), it would be a good dinner for hungry travelers. I head to the kitchen and call out to Rosy in her living quarters next to the kitchen. Together, we start fixing the pilaf and getting the table set for the two extra guests.

Vegetable Pilaf

Prep Time 20 minutes
Cook Time 40 minutes
Total Time 1 hour
Servings 6
A flavorful vegetable pilaf that goes perfectly with curries and lentils.

Ingredients

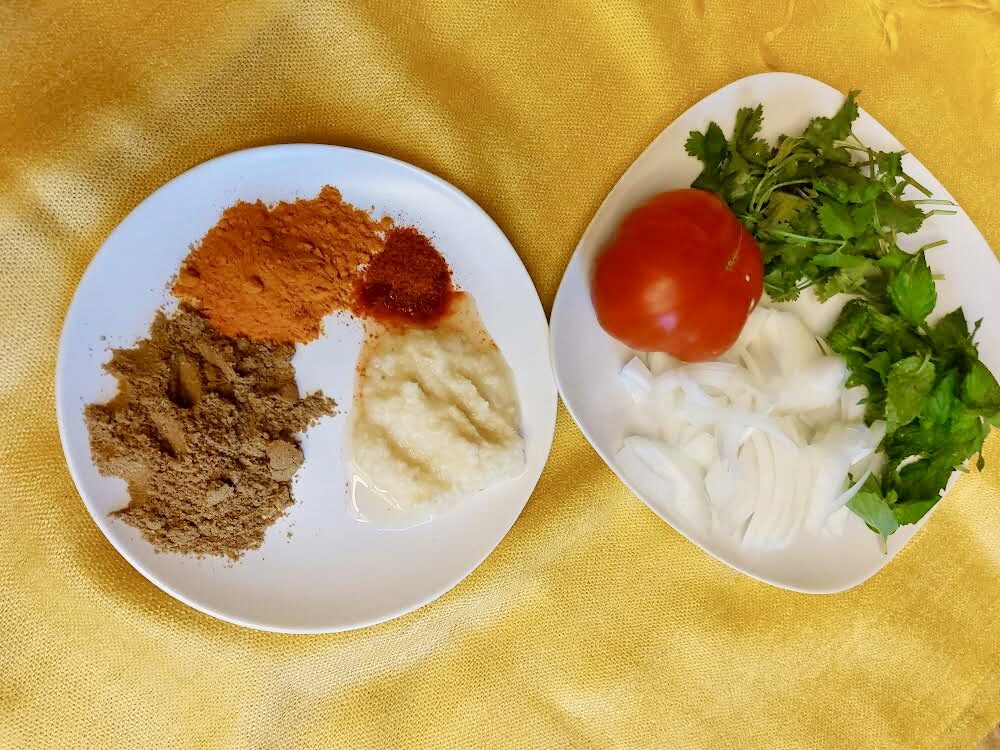
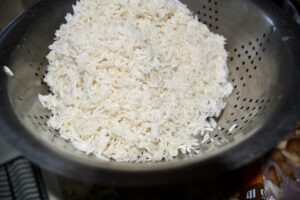
  • 3 cups Basmati rice (washed 4 times and soaked for 20 minutes )
  • ¼ cup cooking oil (your choice)
  • 2 medium Bay leaves
  • 5 pepper corns
  • 4 cloves
  • 1 black cardamom
  • 2 small green cardamoms
  • 1 small cinnamon stick (about 1 inch)
  • 2 whole Serrano green chilies (stem removed, slit half-way down the middle (optional))
  • 2 medium onions (peeled and sliced thin)
  • 1 tbsp fresh garlic paste (or you can use ready-made garlic and ginger paste)
  • 1 tbsp fresh ginger past (or you can use ready-made garlic and ginger paste )
  • 1 tsp turmeric powder
  • 2 tsp coriander powder
  • dash red chili powder (optional)
  • ½ bunch fresh cilantro (pick leaves and a bit of the stem, grind to a paste or chop finely, about ¼ cup)
  • 4 medium tomatoes (chopped or pureed coarsely)
  • 1 cup mixed peas and carrots (I use a frozen pack )
  • 3 cups vegetable broth
  • Salt to taste

Garnish

  • ½ sliced onion, cashew nuts, and raisins (all optional—or you could sprinkle the pilaf with some chopped cilantro/coriander leaves)

Instructions 

  • Heat oil in a large (6-quart) cooking pot over medium heat.
  • Add whole spices and whole green chili. If you slit it midway down the center, it adds more heat to the curry. If you don't want that, just punch it once with a fork so it does not burst in the hot oil. Let it splutter for about 30 seconds, and then add the onions.
  • Sauté the onions until they turn opaque and start to brown slightly at the edges. Stir occasionally so that the onions don't burn. About 4 minutes.
  • Add ginger paste, garlic paste, and spice powders. Continue to sauté for an additional 2 minutes.
  • Be sure to scrape the bottom of the pan to make sure nothing sticks and burns. Add the chopped tomato and cilantro.
  • Cook, stirring frequently, until most of the moisture is absorbed and the oil starts to rise on the edges of the pan. About 10 minutes.
  • Add the drained rice and carefully sauté it for about 3 minutes until the rice starts to turn opaque. Make sure it does not stick to the bottom of the pan and burn!
  • Pour in the stock and water, stir, cover, and boil on medium heat. About 10 minutes.
  • Add the peas and carrots and gently stir them in.
  • Cover and cook on medium-low. When the water starts to evaporate and pits form on the top of the rice, reduce the heat to low. Cook another 5-6 minutes.
  • Check a few grains of rice to see if the rice is done by pressing a grain between the thumb and forefinger. If it is still gritty, cover it and cook on low heat for 2 minutes more.
  • Turn the heat off and let sit for 5 minutes.  Fluff rice with a fork.     
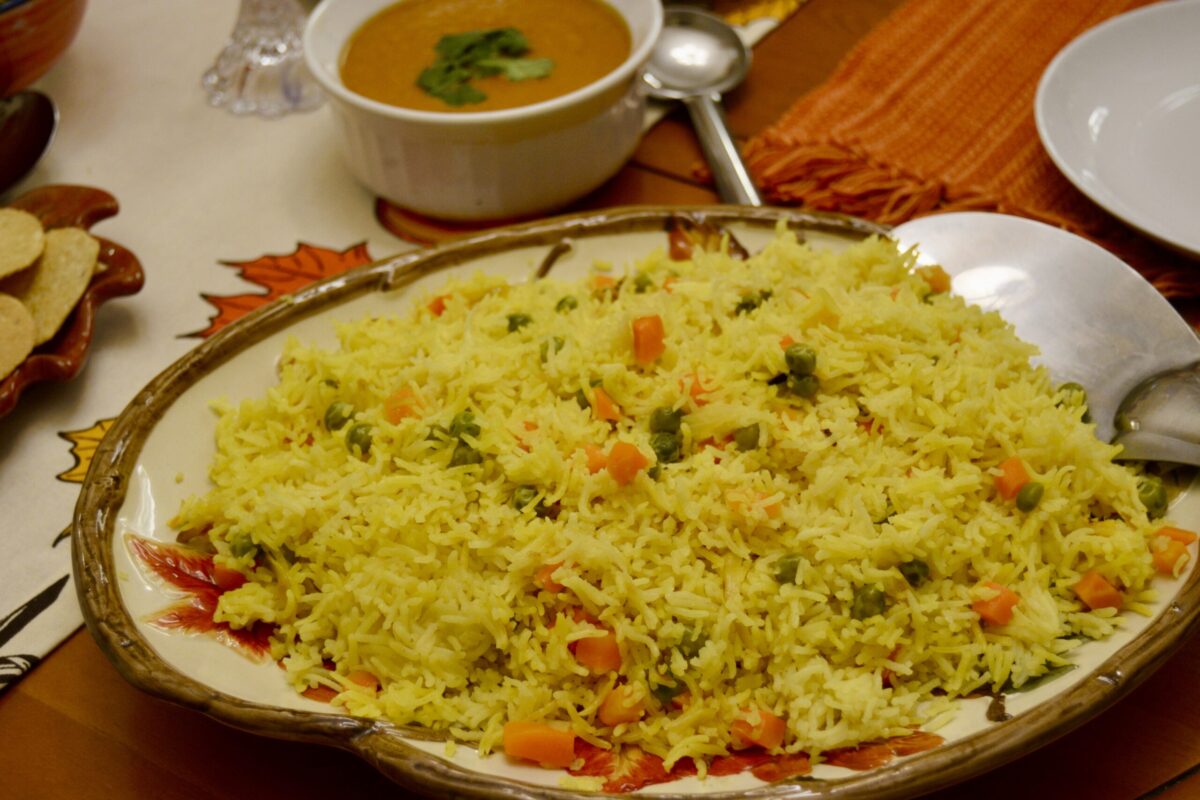
  • Serve on a rice platter or serving dish and garnish with sauteed onions, cashews, raisins, or chopped fresh cilantro/coriander.
  • This makes for a  satisfying meal paired with raita.  It also goes well with any curried lentil, or vegetarian or non-vegetarian curry, or with any style raita. 

Notes

You can finish fixing the rice in the bake. Be sure it is an oven safe pot or transfer to a roaster pan or dish. Heat oven to  200 degrees F and place the pilaf in the oven when pits start to appear on the rice surface. It needs to be covered while baking. You could use a foil cover if your dish does not have one. Bake at 170-180 degrees F for half an hour.
If you are familiar with an Insta Pot or manual pressure cooker you could follow cooking instructions until you add the water (you need half the amount in a pressure cooker). Follow the manual instructions for cooking the rice. 
You can also add 2 medium potatoes, peeled and quartered or a cup of cauliflower flowerets.
Sometimes, I add a teaspoon of store bought korma masala from the Indian grocery store. If you use it, go easy. It packs a punch!
Once the rice starts to boil you can add a tablespoon of kasturi methi or chopped mint. 
Course: Side Dish, Vegetarian
Cuisine: Indian
Keyword: pilaf, rice


Next to wheat, rice is one of India’s leading food staples. Most dals and curries go well with plain boiled white rice. In India, a majority of households use plain cooked rice in their meals at least once during the day. There are different types of rice:

Short-grained—high in starch and tends to be sticky

Medium-grained—longer and a little chewy when cooked

Long-grained rice—less starchy with a firmer texture and excellent for pilafs.

The popular Basmati rice is a long-grained rice grown at the foothills of the Himalayas, both in India and Pakistan. It is mainly used for pilafs and Biryanis and has a nutty popcorn fragrance. The name Basmati originates from the Sanskrit word Vasmati which means fragrant.

Saada Ubala Hua Saphed Chavaal (Plain Boiled White Rice)

Prep Time 15 minutes
Cook Time 15 minutes
Resting Time 5 minutes
Total Time 35 minutes
Servings 4
A leading food staple in India, most dals and curries go well with plain boiled white rice.

Ingredients

  • 2 cups white Basmati rice
  • cups water

Instructions 

  •  Place the rice in a medium bowl.
  • Half-fill the bowl with water and wash the grains by gently sifting and rubbing the rice with your fingers. Do this at least 4 times.
  • Now add enough water to the bowl just to cover the rice and let the rice soak in the water for 15 minutes. (You can skip the step if you are in a hurry, but add 4 cups of water when boiling).
  • Rinse and strain the rice through a rice or fine strainer under running water.
  • Transfer the rice to a medium pot and add 3¾-cups of water.
  • Stir the rice and bring the uncovered rice to a boil on medium heat. It takes about 15-20 minutes.
  • Once it comes to a rolling boil, lower the heat to low, stir gently, and cover the rice with a tight lid.
  • Let it simmer on low for about 15 minutes. Try not to uncover the rice and stir at this stage, as it will allow the steam to escape, making the rice drier.
  • Turn off the heat and let sit undisturbed for 5-7 minutes. Remove the lid and fluff the rice with a fork by gently lifting the rice up all around the pot, and-breaking up any clumps.
  • Transfer to a serving bowl or dish when ready to serve.
  • Plain boiled rice tastes good with any dal and any curried-style meats or vegetables. You can serve it as a meal with the usual array of pickles, raitas, papads, and chutneys.

Notes

Test for Doneness:
Crush a few rice grains against a flat surface to test for doneness. If it feels grainy, then the rice is not done. If that happens, sprinkle about a tablespoon of water over the rice and let it sit on low heat for 5 minutes. Or, you can place it in the oven at 180F temp for 10 minutes.
Stovetop and Oven Method:
Cook the rice on the stovetop in an oven-safe pot. Set your oven to 180 F. Once the water nearly evaporates and pits start forming on the rice's surface, turn off the heat and transfer the cooking pot to the oven. Let it bake for about 20 minutes until done.
Boiling Rice in Lots of Water:
Another way to fix rice is to wash and rinse the rice as above. Then in a pot, add about 4 times the water as rice (1:4 ratio). Bring the rice to a boil on medium heat, then reduce the heat and let the rice cook for 15 minutes. Test the grain to see if it's almost done. Turn off the heat. Now strain the rice through a rice strainer or fine sieve. Be careful of the steam! When all the water is drained, give the sieve a shake and put the rice back into the pot Cover with a tight lid and let it sit for 15 minutes before you fluff it.
Most Indian households, when using this method of cooking rice, save the water that has essential minerals and nutrients to drink later. This is especially so in the southern states of India where "kanji' (rice water ) is used as an energy booster for its healthy nutrients.
When we were kids and had an upset stomach, Mama always gave us plain soupy boiled rice and plain yogurt with pepper and salt to settle our stomachs. I still do that to this day whenever anyone in the house has an upset stomach.
Before synthetic starches came on the market in India, this starchy water (kanji) was diluted and used by our dhobis (people who washed our clothes in the absence of washing machines) to starch cotton shirt collars, kurtas, saris, and cotton table linen.
Be aware that cooking times may vary in higher altitudes, and you may need to increase the water by about 1/4 ounce and the resting time by about 5 minutes more.
If you are using white rice other than Basmati, follow the cooking instructions on the packet. Also do this when you are using a manual or electric pressure cooker, microwave oven, or rice cooker.
Course: Side Dish
Cuisine: American, Indian
Keyword: Basmati, rice

Pilafs are good sides for different styles of cuisine. This is a simple carrot and pea pilaf with not too many spices. It can complement BBQ meats and most Indian dishes. It goes well with spicy curries.

Gajar Mattar Palao (Carrot and Pea Pilaf)

Prep Time 15 minutes
Cook Time 35 minutes
Total Time 50 minutes
Servings 4
A quick, easy, but delicious rice dish to complement BBQ meats and most Indian dishes. It goes well with spicy curries.

Ingredients

  • 2 cups white basmati rice
  • 3 tbsp oil
  • 1 stick cinnamon (about an inch)
  • 2 green cardamon
  • ¼ tsp clove powder (or 3-4 cloves)
  • 1 tsp tumeric powder
  • 2 bay leaves
  • ½ medium onion (finely sliced)
  • 1 tsp garlic paste
  • 1 tsp ginger paste
  • 1 tsp salt
  • 4 cups water (plus 1 tbsp)
  • ¾ cup frozen peas and carrots

Instructions 

To prepare:

  • Pick rice clean of any grit. Wash 4 times. Cover with enough water and let soak.
  • Meanwhile, prep your ingredients.
  • When you have all your ingredients ready, rinse the rice, and set it aside.

To cook:

  • Heat oil in a medium heavy-bottomed pot on medium-high.Add the bay leaves, whole cardamom, cloves, and cinnamon stick. Let sauté 1 minute.
  • Add the onions and sauté 4-5 minutes until translucent.
  • Add the ginger and garlic and stir for 2 minutes, scraping the bottom so that the ginger does not stick and burn.
  • Add the turmeric and give it a stir.
  • Add the rice.
  • Sauté, gently stirring occasionally, for about 2 to 3 minutes until the grains turn a little opaque.
  • Add salt and water. Stir them to mix with rice.  
  • Bring the pot to a boil on high heat, uncovered. Immediately turn down the boiling water to a low simmer.
  • Add the peas and carrots. Stir.
  • Cover with a lid, and let cook on medium-low for 15 minutes. Do not uncover the lid or disturb the rice at this point.
  • Once the rice puffs out a bit and most of the water has evaporated, turn the heat to low and cook for 5 minutes.
  • Move the pot off the burner and let it sit covered for 5 minutes. Uncover and puff the rice up with a fork.
  • Spoon into a serving dish. Break up any rice lumps.

Notes

You can garnish the pilaf with sautéed cashew nuts or fried onions.
You can check to see if the rice is undercooked by rubbing a few grains between your thumb and forefinger. If they feel granular, then add a splash of water. Cover and cook on low for a few more minutes.
If you cook your rice in an oven-safe pot, once most of the water has evaporated, you can finish cooking it in the oven at 180F degrees for 10 minutes.
A manual pressure cooker or the Insta Pot cuts cooking time. Just follow the manual instructions.
Course: Side Dish, Vegetarian
Cuisine: Indian
Keyword: pilaf, rice

In the southern part of India, where coconut grows in abundance, it finds its way into many dishes. Fresh or dried, grated or ground, it adds flavor to the dish.

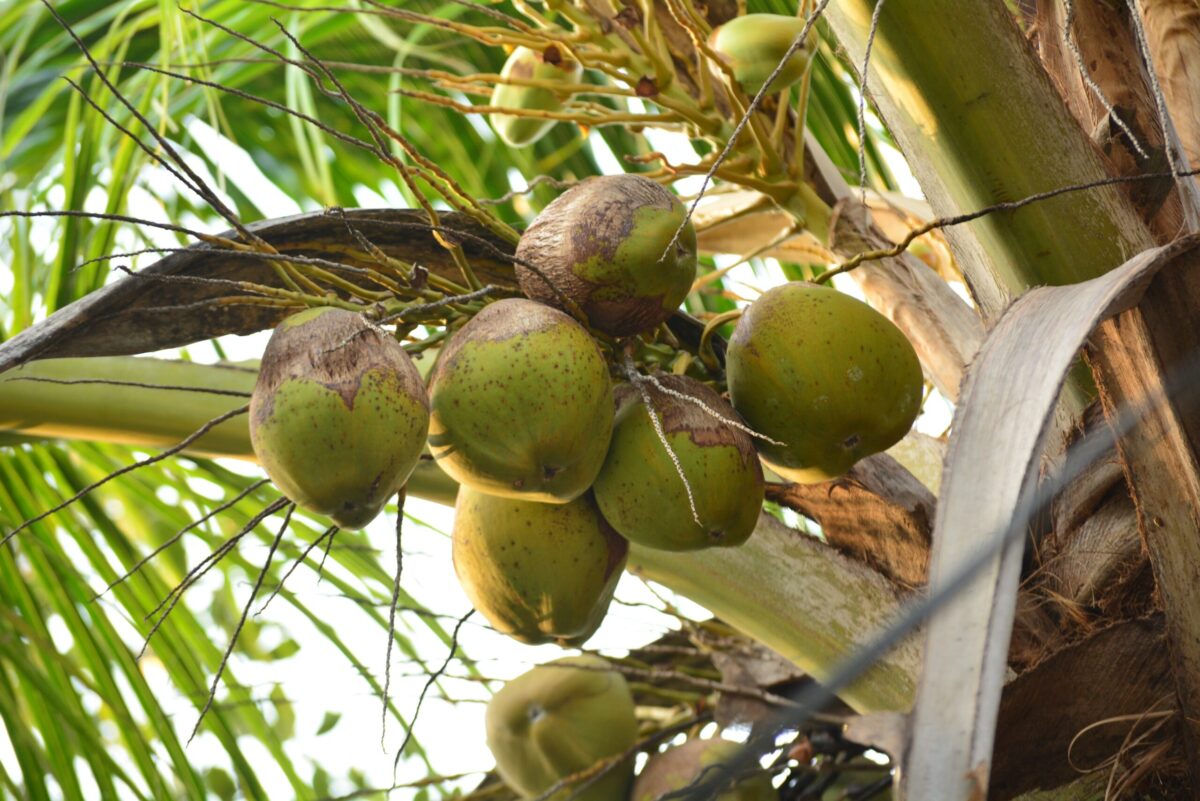
I remember the old-fashioned scraper in the kitchen used when I was a kid.  It was a metal blade shaped like a scythe, at the end of which was a circular metal disk with sharp teeth. The metal blade was mounted on a square block of wood. To scrape the coconut, you had first to remove the husk, then split the brown kernel in half. Next, you set up the scraper on the floor with a bowl or tray to catch the grated coconut. You sat on your haunches on the floor and steadied the board with the weight of one foot. Holding the coconut half against the scraping metal, you would move it back and forth across the grate, and the white meat would fall into the receiving bowl or plate. The metal teeth were sharp, and you had to be careful. The best part was the sharp blade was used to cut meat and poultry. It was always fascinating to watch the cook doing it. We were not allowed near the gadget, of course!

These days they have coconut graters that you can mount on the kitchen counter. It has a handle to swivel the grater head and scrape the meat off the coconut.  It does a pretty effective job. If you cannot get a fresh frozen pack of coconut meat and do not own a scraping gadget, buy a whole brown coconut from the grocery store with the husk removed. Shake it to see if you can hear the water swish inside. That means it is still fresh. Knock it against a hard surface to split it in half. You might have to break it into two pieces to do that.  Cut away the outer brown part and use a standing grater. Grate the white coconut meat only.

Here is a raita made with coconut, which we enjoy with any pilaf.

Coconut Raita

Prep Time 15 minutes
Cook Time 4 minutes
Total Time 19 minutes
Servings 4
A sweeter version of raita that goes well with pilafs, plain boiled rice, dal, sabzi, or curry. 

Ingredients

  • ¾ cup freshly grated coconut (Roasted ground cumin and red chili powder (paprika orCayenne) for Garnish)
  • cup plain yogurt (whole, lowfat, or fat free)
  • ½ small onion (chopped fine)
  • 1 medium Serrano chili (to your taste, chopped fine)
  • 2 tbsp fresh green cilantro (chopped fine)
  • ½ cup water
  • salt (to taste)
  • Dash roasted ground cumin and chili powder (paprika or cayenne) (for garnish)

Instructions 

  • In a medium bowl, beat the yogurt with water and salt until smooth. 
  • Add the rest of the ingredients and mix well.
  • Pour into a serving dish and garnish with the roasted ground cumin, pepper, and chili powder.
  • Serve with an Indian meal of Pilaf or plain boiled rice, dal, sabzi, or curry. 
  • As with the cucumber raita, it can also eat it as a snack.

Notes

Shout out to Dileesh Kumar on Unsplash for the great photo!
Course: Side Dish
Cuisine: Indian
Keyword: coconut, raita, yogurt