
")
My tomatoes and zucchini did not do well this summer as a sudden cold spell stunted their growth. However, the eggplant (brinjal) I planted later grew fast and furious in the abnormally hot summer heat. I planted the Black Beauty and the Japanese long variety (Ichiban). I fix the long eggplant in various ways. One of them is in this recipe.
This eggplant dish is flavorful and tangy. Good as a side or in a wrap.

Dahi Baingan (Eggplant with Yogurt)
This eggplant dish is flavorful and tangy. Good as a side or in a wrap.
Ingredients
- 1 lb dark eggplant
- 1 medium onion (sliced)
- 1½ tsp ginger (chopped finely)
- 1 medium green chili (chopped in half)
- ½ tsp cumin seeds
- ½ tsp turmeric powder
- 1 tsp cumin powder
- ½ tsp red chili powder (optional)
- 3 tbsp plain yogurt (beaten smooth)
- ½ tsp garam masala (found in Indian grocery stores)
- 3 tbsp cooking oil
- 1 tsp salt (or to your taste)
- ¼ cup water
- 2 tbsp chopped cilantro (for garnish)
Instructions
- Wash and drain the eggplant. Cut them into round slices (not too thick) or into bite-sized bits.
- Mix all the dry spice powders and salt in a medium bowl with the chopped eggplant. Make sure the eggplant is well-coated with all the spices. Set aside.
- Heat the oil in a heavy-bottomed wok or skillet on medium-high heat.
- Add the cumin seeds, stir for about 20 seconds.
- Add the chopped green chili. Stir. Stir it. About 20 seconds.
- Now, add the chopped ginger and stir for about 30 seconds.
- Add the sliced onions. Sauté the onion for 4 minutes until it starts to turn slightly brown.
- Now add the marinated eggplant. Stir well.
- Add ¼ cup of water. Cover, turn the heat down to medium, and let it cook for 4 minutes until the sliced eggplants turn semi-soft and the oil starts to surface.
- Uncover and add the yogurt. Stir well and cook uncovered, stirring occasionally, until the oil begins to surface again and the eggplant is cooked. Approximately 10 minutes.
- After 10 minutes, taste and test it for salt. Add more, if needed. Stir. Cover and let sit for 5 minutes so that the flavors are well absorbed.
- Empty into a serving dish and garnish with chopped cilantro.
- Use in a wrap or with rice and dal or dal and roti.
Notes
If lactose intolerant, add a tablespoon of tomato paste or 2-3 tablespoons of tomato sauce. Add it after the onions are done. Cook for about 2 minutes, and then add the eggplant.
")
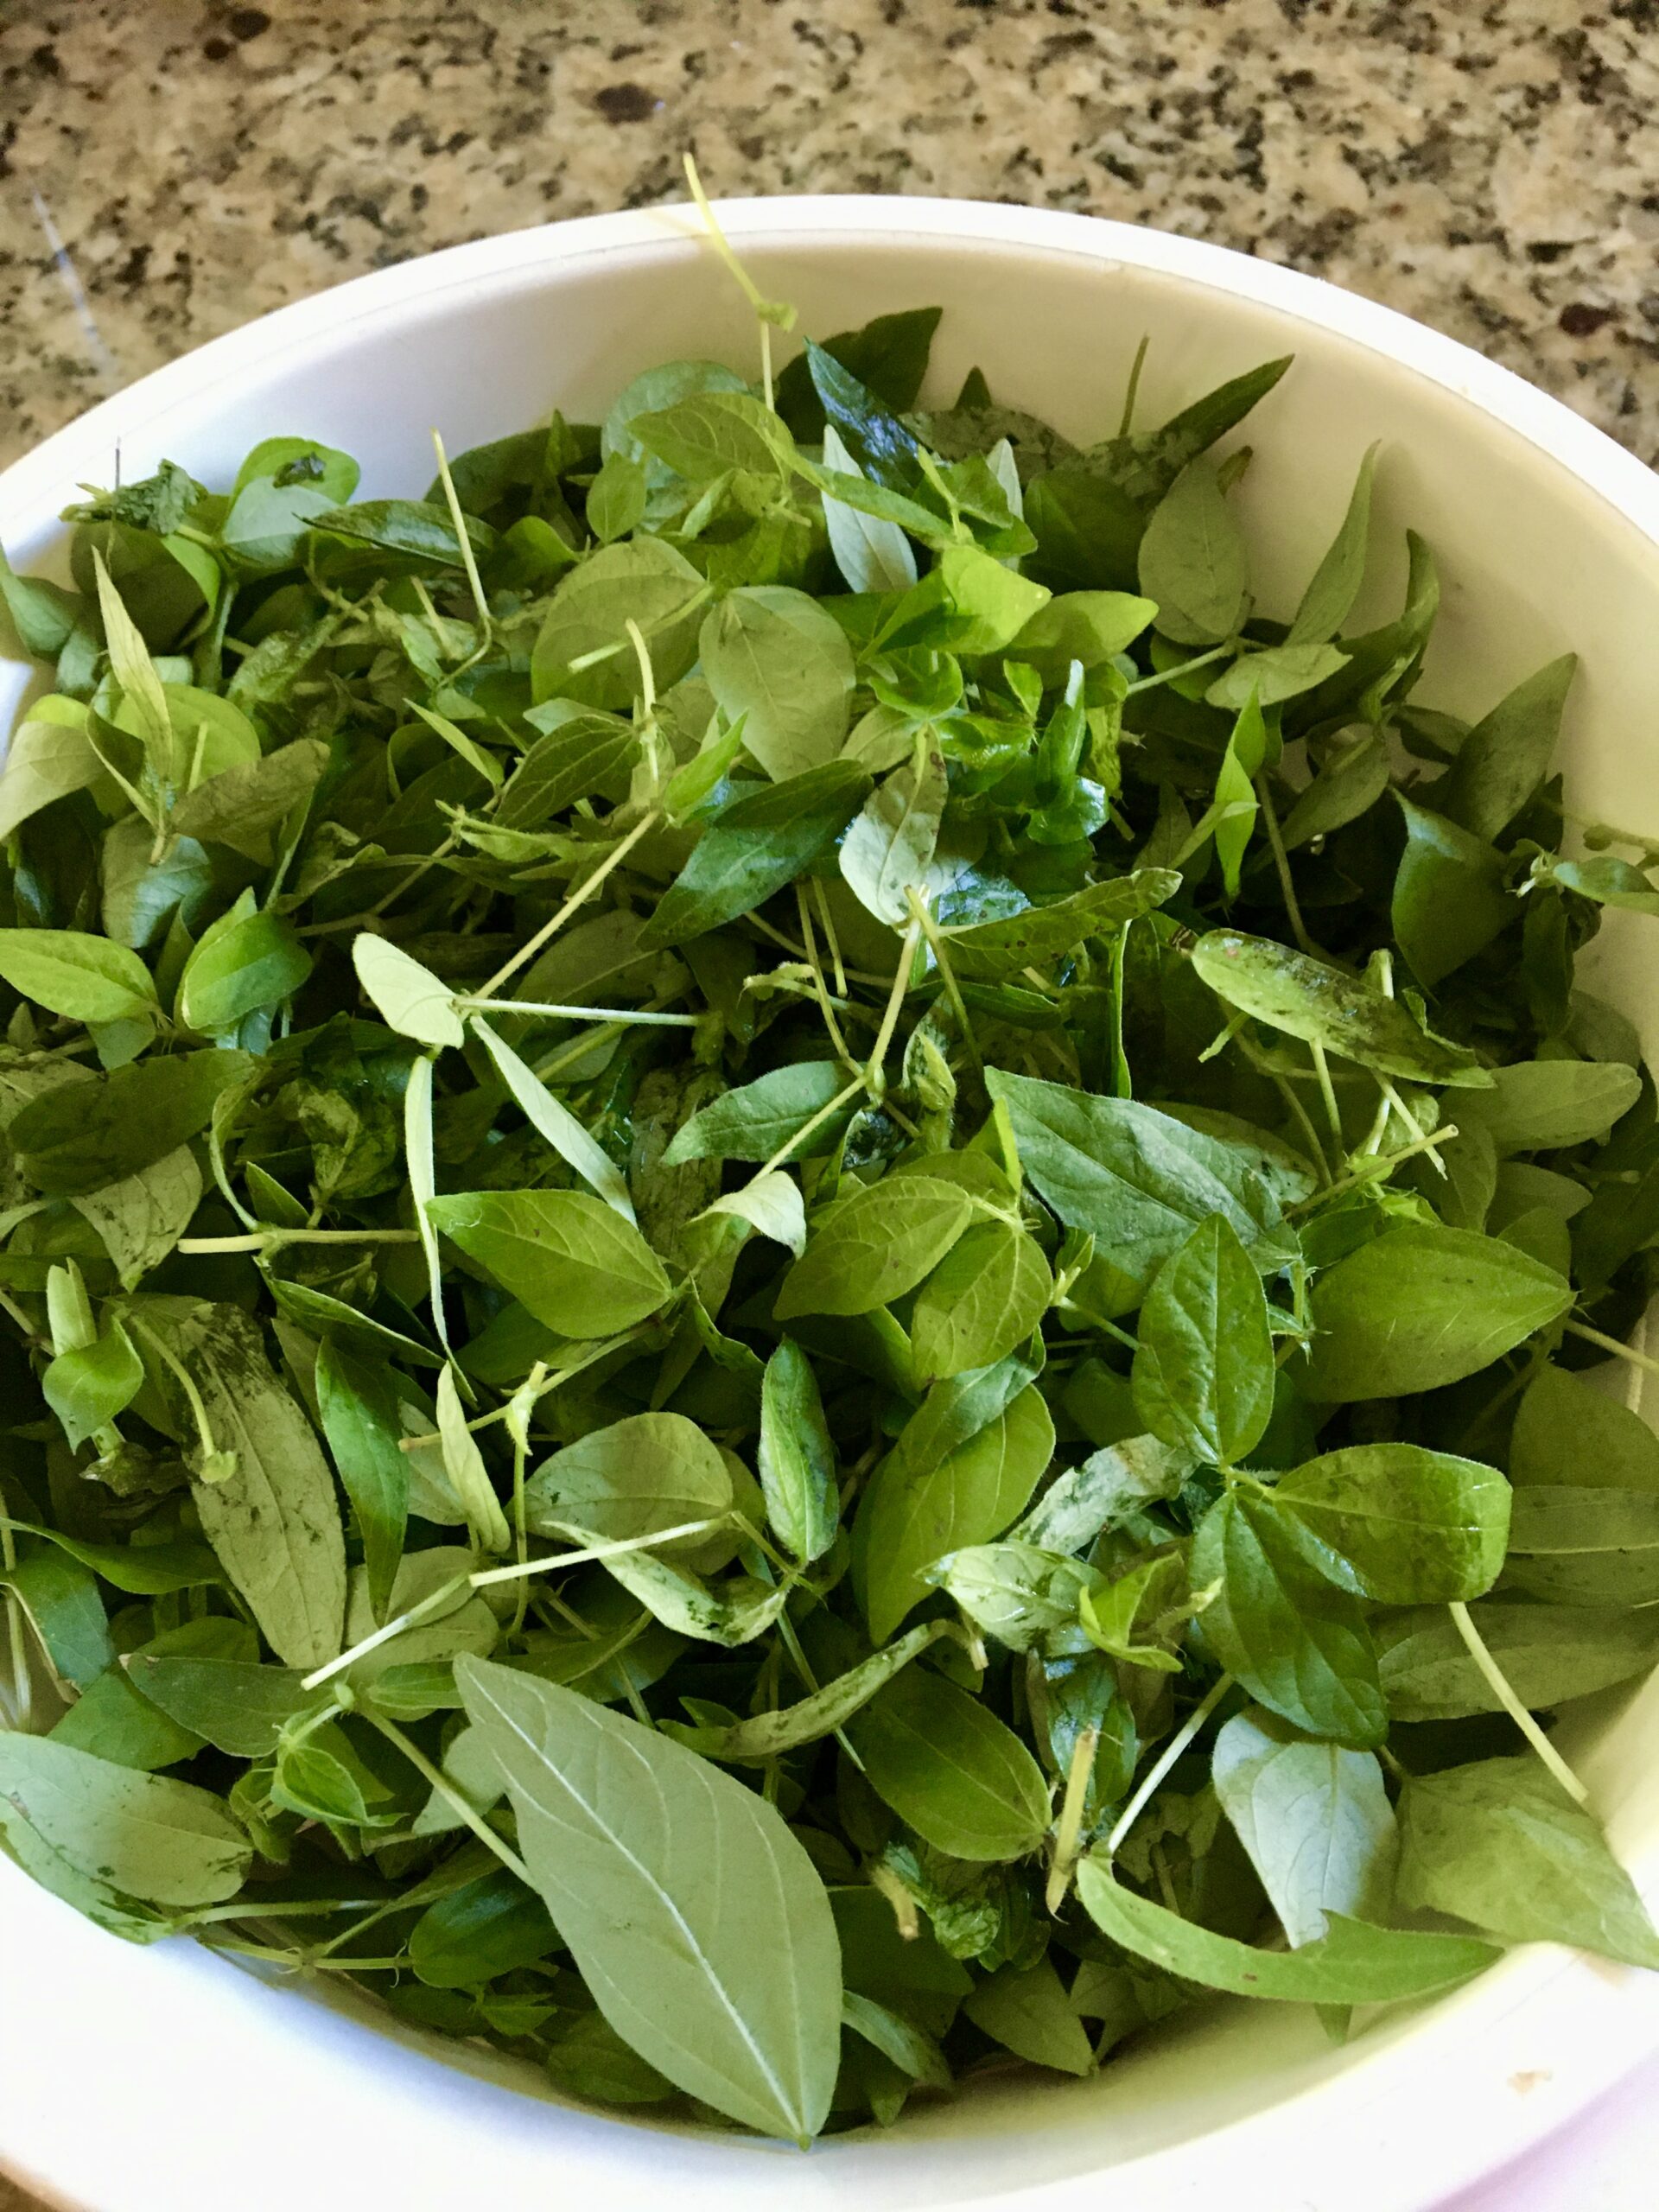
 I walk out into my backyard to pick some eggplant that are ready to be cooked. Suddenly, I spot some lush greenery in the corner of the garden by the tree I hang my birdhouse on. Strange! I do not remember growing anything in that corner.
I walk in for a closer inspection. It suddenly dawns on me what the lush green growth is.
Long story short, I had bought a bag of mung beans and left it in the pantry. A bit later, I saw some black spots on the bag. On closer inspection, I found they were weevils—a challenge when buying lentils from some of the stores. I let out a stifled shriek since I am allergic to anything creepy and crawly! My first instinct was to throw the bag of beans in the garbage can outside. Then, since I am prudent about waste, I decided to empty it in a corner of the garden so that the birds could feast on it! To my amazement, the beans must have fallen on the fertile soil in my backyard, taken root, and produced this healthy patch of greens.
I surf the internet to see if mung bean leaves are edible. They are. I gather some tender leaves and fix a potato and mung leaves sabzi (vegetable dish).
Mung Patta Aloo Sabzi (Green/Golden Gram Leaves with Potatoes)
A healthy, delicious vegetarian side dish that pairs well with dal and rice or rotis for lunch or dinner.
Ingredients
- 2 cups Mung leaves (rinsed well and chopped)
- 2 medium potatoes (scrubbed, peeled, and chopped into two in cubes or to your preference )
- 3 tbsp cooking oil
- ½ medium onion (peeled and chopped fine)
- 1-2 whole red chili peppers (optional)
- ½ tsp whole cumin seeds
- ¼ tsp turmeric powder
- 1 tsp cumin powder
- ½ tsp salt (or to taste)
- 3-4 tbsp water (for cooking)
- garlic oil (a drizzle)
Instructions
- Place a medium wok or skillet on medium heat.
- Add the 2 tablespoons of oil and wait until hot. Sprinkle in the whole cumin seeds until they start to sizzle.
- Add the red chili. Stir for 30 seconds.
- Add the chopped onion. Sauté for about 7 minutes until the onions start to turn golden.
- Turn the heat low and add the turmeric and cumin powder. Give it a stir and quickly add the potatoes.
- Stir till the potatoes are well coated with the spices.
- Turn up the heat to medium-low. Add the chopped mung leaves and salt. Stir, then add about 2-3 tablespoons of water. Stir and cover.
- Let it cook for about 5 minutes.
- Uncover and check the potatoes. If undercooked, add another tablespoon or two of water and cook for another 3 minutes until the potatoes are almost done.
- Uncover and cook for another 8 minutes until the potatoes are cooked. Most of the moisture should have evaporated by now. Drizzle with garlic oil.
- Turn off the heat. Cover and let sit 5 minutes before serving.
- Serve with dal and roti or rice.
")
The Indian market for mushrooms (khumbi) was negligible when we were growing up. It was an uncommon product in the market, and warnings of mushrooms being poisonous kept many people from eating them. As such, it was never really a big part of Indian cuisine.
In recent years, mushrooms have been going up the vegetable chain into the Indian kitchen.
My first real introduction to mushrooms was in the USA when I watched my brother-in-law, Carl, slice up some white button mushrooms and sauté them in butter with a dash of salt and cracked pepper. He served them for breakfast with bacon and fried eggs. The mushrooms were delicious.
I slowly incorporated them into my Chinese stir-fries, Western casseroles, and omelets. Mushrooms, I soon learned, went well with Indian cuisine as well. I started fixing Indian sabzis (sautéed veggies) like mushroom peas curry, mushroom bell pepper, mushroom and cabbage, and mushroom korma, etc.
This easy mushroom curry recipe goes well with rice or roti. It is tangy with a slight bite.
Mushroom Curry (Taridar Khumbi)
An easy mushroom curry, tangy with a slight bite, that goes well with rice or a roti.
Ingredients
- 8 oz white button or baby bella mushrooms (also know as cremini mushrooms, about 2 cups)
- 2 medium bay leaves
- 1 medium onion (sliced relatively thin, about 1 cup—if too long cut the slices in half.)
- 1 stick cinnamon (or ⅛ tsp cinnamon powder)
- ¼ tsp cumin seeds
- 1 tbsp ginger-garlic paste
- 1 small green chili, halved (or 1 dry red chili or to your taste)
- 1 large tomato (chopped fine—about ¾ cup)
- ½ tsp red chili powder (or to your taste)
- 1 tsp cumin powder ( 2tablespoons chopped cilantro/ green coriander for relish )
- ½ tsp tumeric powder
- 1 tbsp ground cashew nuts (optional)
- ¼ tsp gram masala
- 1 tsp salt (or to your taste)
- 1 cup hot water (or vegetable or chicken broth)
- 3 tbsp oil
- 2 tbsp chopped cilantro / green coriander (for relish)
Instructions
To Prepare:
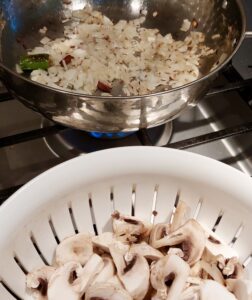
- Gently wipe the mushrooms with a damp cloth to get rid of any grit.
- Slice the mushrooms in half, then slice each half into 2 or 3 slices, depending on the size on the mushroom. Try to keep the slices even.
- Set aside.
To Cook:
- Heat 3 tablespoons of oil in a heavy-bottomed skillet or wok on medium heat.
- When hot, add the green chili until it begins to brown, about 30 seconds.
- Now add in the cumin seeds. When they start to splutter, add the bay leaves and cinnamon stick, stir for about 30 seconds.
- Now, add the onions. Sauté until almost golden. About 6-7 minutes.
- Add the tomatoes and sauté for 4-5 minutes until the tomatoes are well blended.
- Next, add the ginger-garlic paste, turmeric, red chili powder, and cumin powder.
- Sauté for another 5 minutes until you see the oil surface.
- Add the ground cashew nuts and garam masala. Sauté for about 2 minutes.
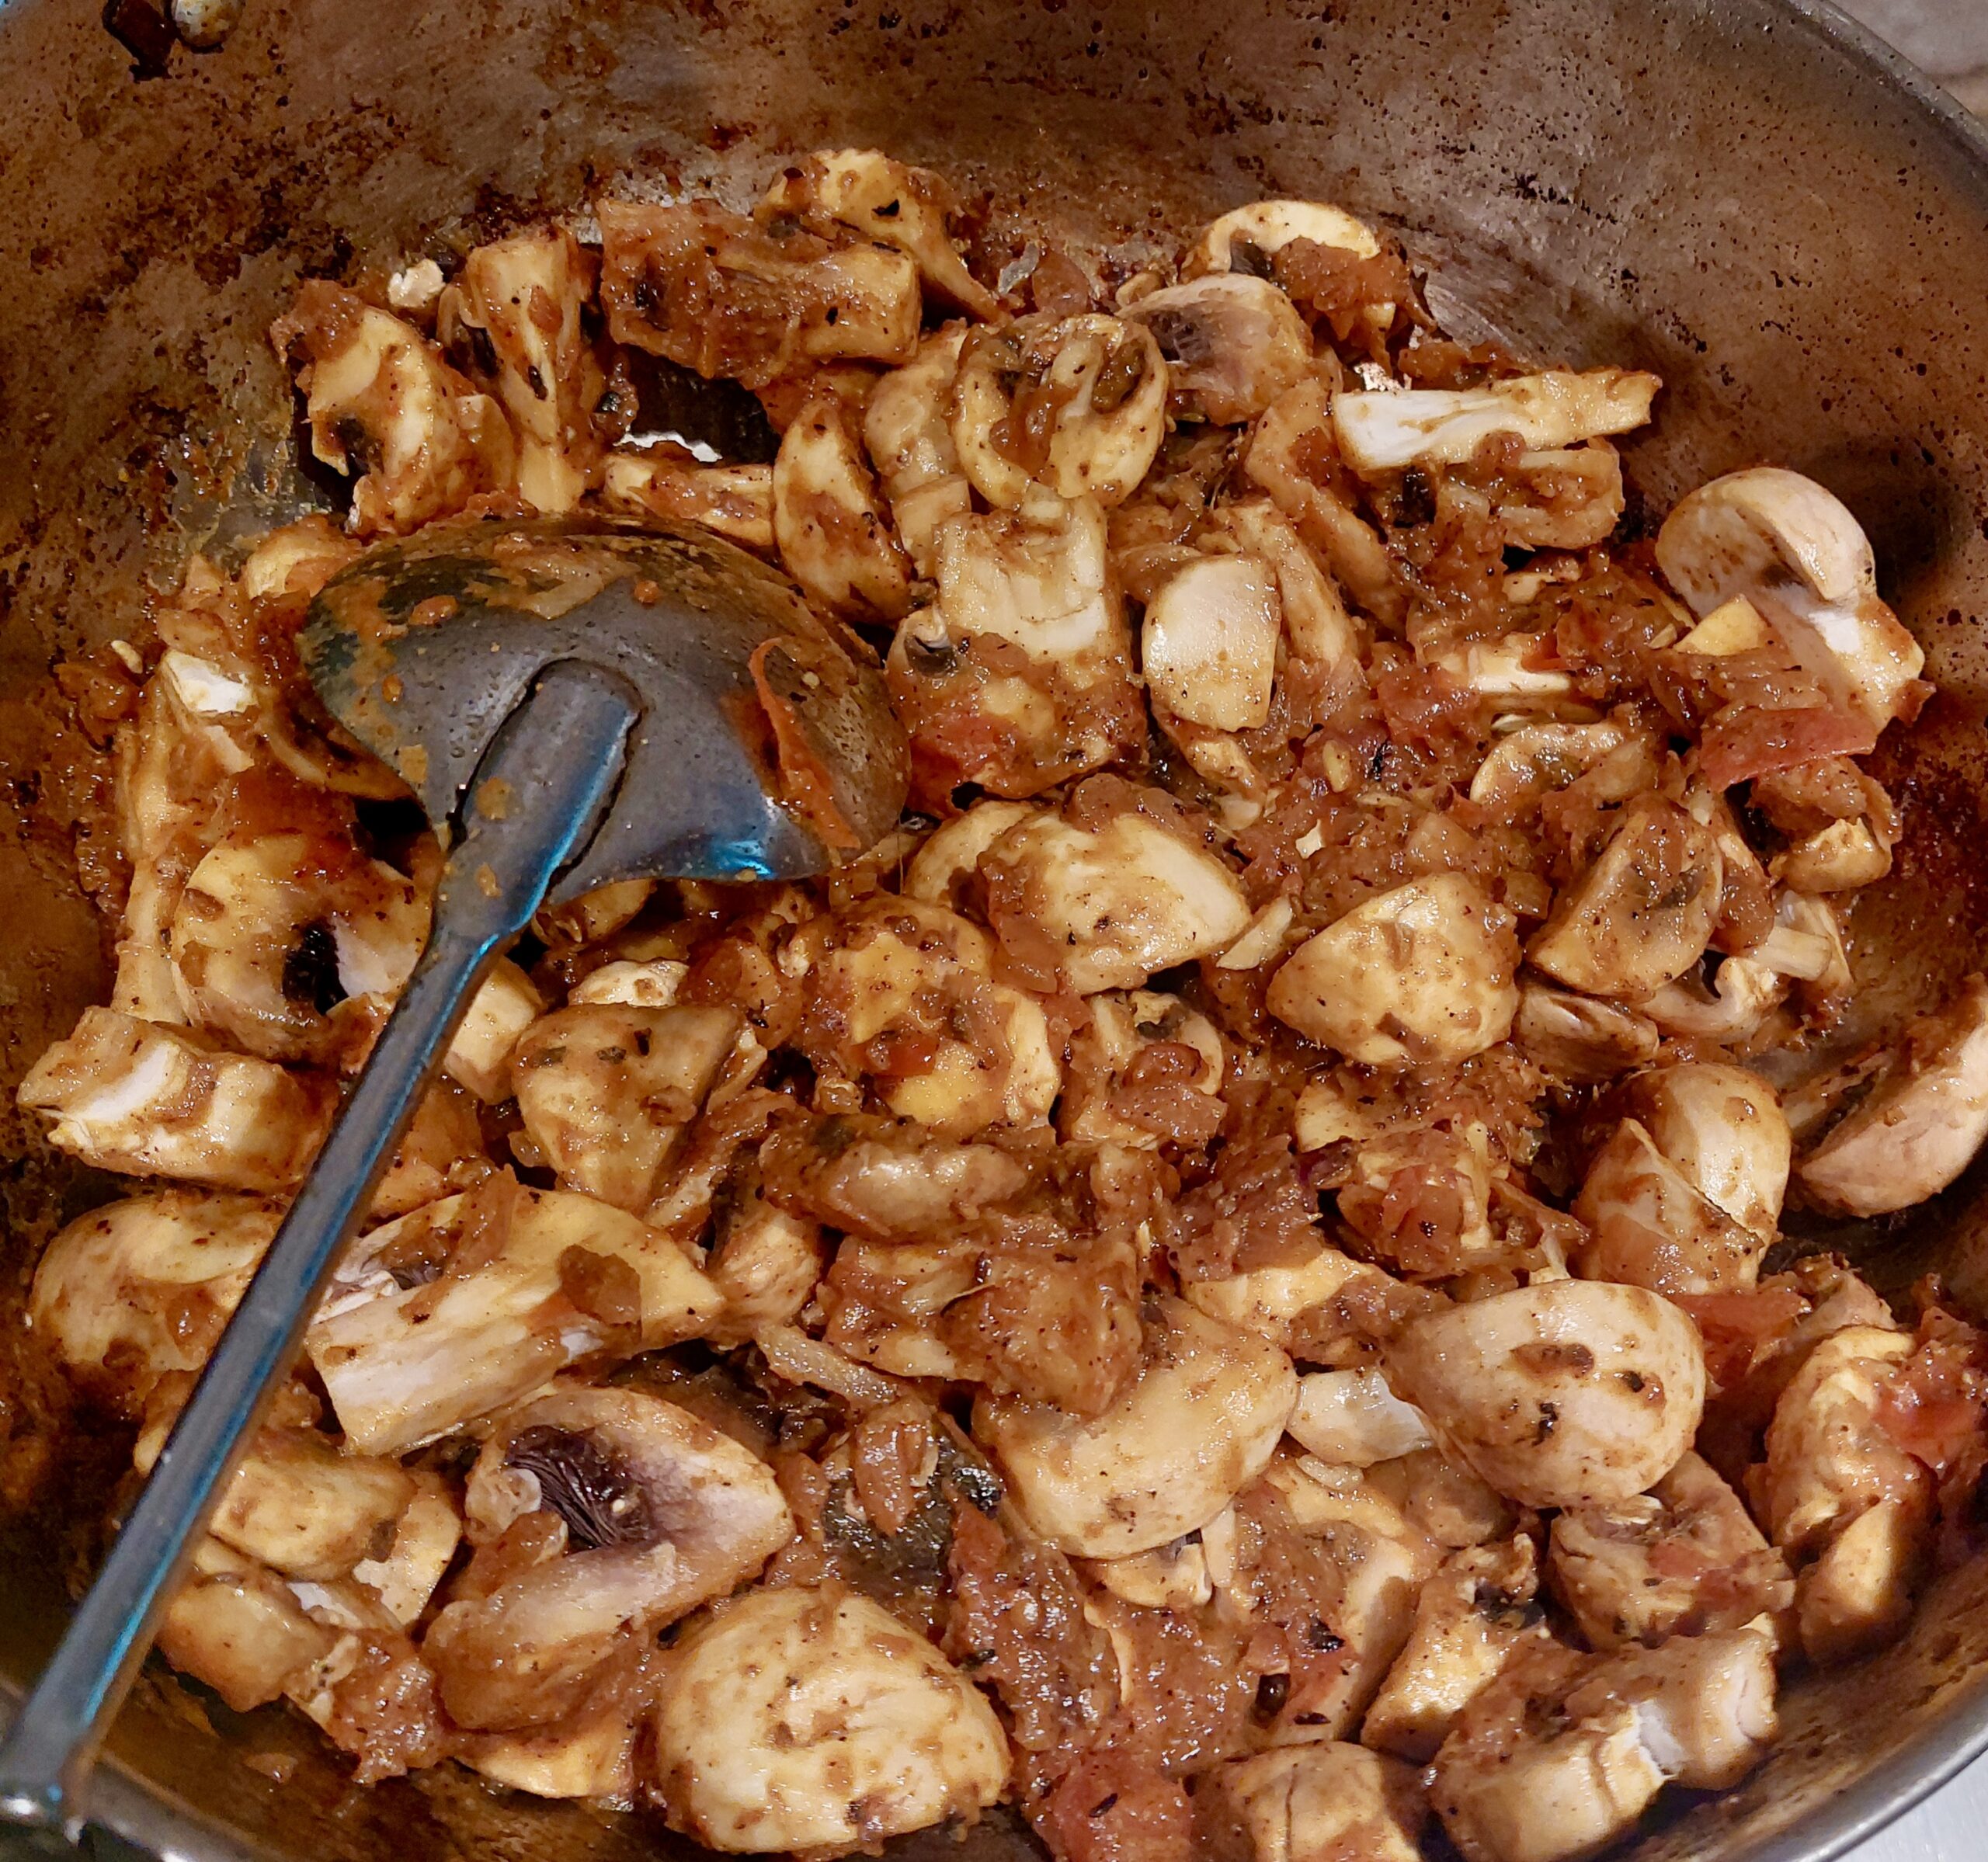
- Now, add the sliced mushroom. Stir gently and well until the mushrooms are nicely coated and the oil starts to surface, approximately 5 minutes.
- Add the cup of hot water or broth. Stir. Let cook for 10 minutes, stirring occasionally.
- Turn off the heat. Sprinkle one tablespoon of chopped cilantro. Stir and let sit for 5 minutes. Pour into a serving dish.
- Garnish with remaining cilantro.
- Serve with any style of rice or roti—pairs well with other flat breads like naan, paratha, or pita.
Notes
 1. If you prefer to wash the mushrooms, you can, but let it drain and dry out a bit before you slice it.
2. If you want to add peas, add ¾ cup of tender peas during the last 10 minutes. You can also zap them for two minutes in the microwave and add them in the last 5 minutes.
3. If using cinnamon powder, add it when you add the other spice powders.
4. If you are allergic to nuts, omit the powdered cashew nuts or add a tablespoon of ground poppy seeds. Adding either of these thickens and lends a creaminess to the gravy.
1. If you prefer to wash the mushrooms, you can, but let it drain and dry out a bit before you slice it.
2. If you want to add peas, add ¾ cup of tender peas during the last 10 minutes. You can also zap them for two minutes in the microwave and add them in the last 5 minutes.
3. If using cinnamon powder, add it when you add the other spice powders.
4. If you are allergic to nuts, omit the powdered cashew nuts or add a tablespoon of ground poppy seeds. Adding either of these thickens and lends a creaminess to the gravy.

It is the month of February. A good month to visit India. We are on a quick visit to my husband’s brother and family. It is worth the long plane ride to see them again.
The windows are open, and there is a cool breeze passing through the second-story flat. I am up early despite the late night of catching up with each other. I sit, feet curled up on the sofa, reading the newspaper while the sweeper mops the floor. I watch fascinated as she squats on her haunches and runs the old towel she uses as a mop over the marble floor. She does that all the way across the room without getting up to stretch herself. The mop bucket is moved along with her as she keeps dipping and wringing the towel before scrubbing the floor again.
In India, dusting, sweeping, and mopping the floors are a daily affair. Everything smells fresh and clean. The sweeper turns the ceiling fan on full blast. I grab the newspaper before it flies away and weigh it down with a cushion. I wait until the floor dries, then walk across to the kitchen to see what the cook is fixing my nephew for brunch before he leaves for work.
Cook is a thin slip of a girl, barely up to my shoulders but with the energy of a hurricane. I watch as she puts together all the ingredients, questioning her as she goes along. I am out of practice speaking the local dialect, but amazingly she understands me!
I write the ingredients down, and later back home I use it as a quick snack or breakfast pancake! Since it is made from chickpea flour, it is high in protein and very filling.
Besan Cheela (Chickpea Flour Savory Pan Cakes)
A quick snack or breakfast pancake! Made from chickpea flour, it is high in protein, very filling, and great before your morning workout!
Ingredients
- 1 cup chickpea flour
- ¼ small yellow onion or shallot (chopped fine)
- 1 small tomato (chopped fine)
- 1 green chili (optional) (chopped fine)
- ¾ tsp ajwain (caraway seeds)
- ¼ tsp cumin seeds (slightly crushed)
- 1 tbsp green cilantro (chopped)
- ¾ tsp salt (or to taste)
- ¼ tsp chili powder (or to taste)
- ½ cup water (more or less to reach pancake batter consistency)
- ¾ tbsp cooking oil
Instructions
- Add the chickpea flour, turmeric, chili powder, cumin powder, salt, caraway, and cumin seeds in a small deep bowl.
- Add water, whisking slowly until you get a smooth pancake-like batter.
- Set aside for 15 minutes.
- After 15 minutes, stir and add the chopped onions, tomatoes, green chili, and cilantro. Mix well. Make sure you get a nice flowing consistency, not too thin or too thick.
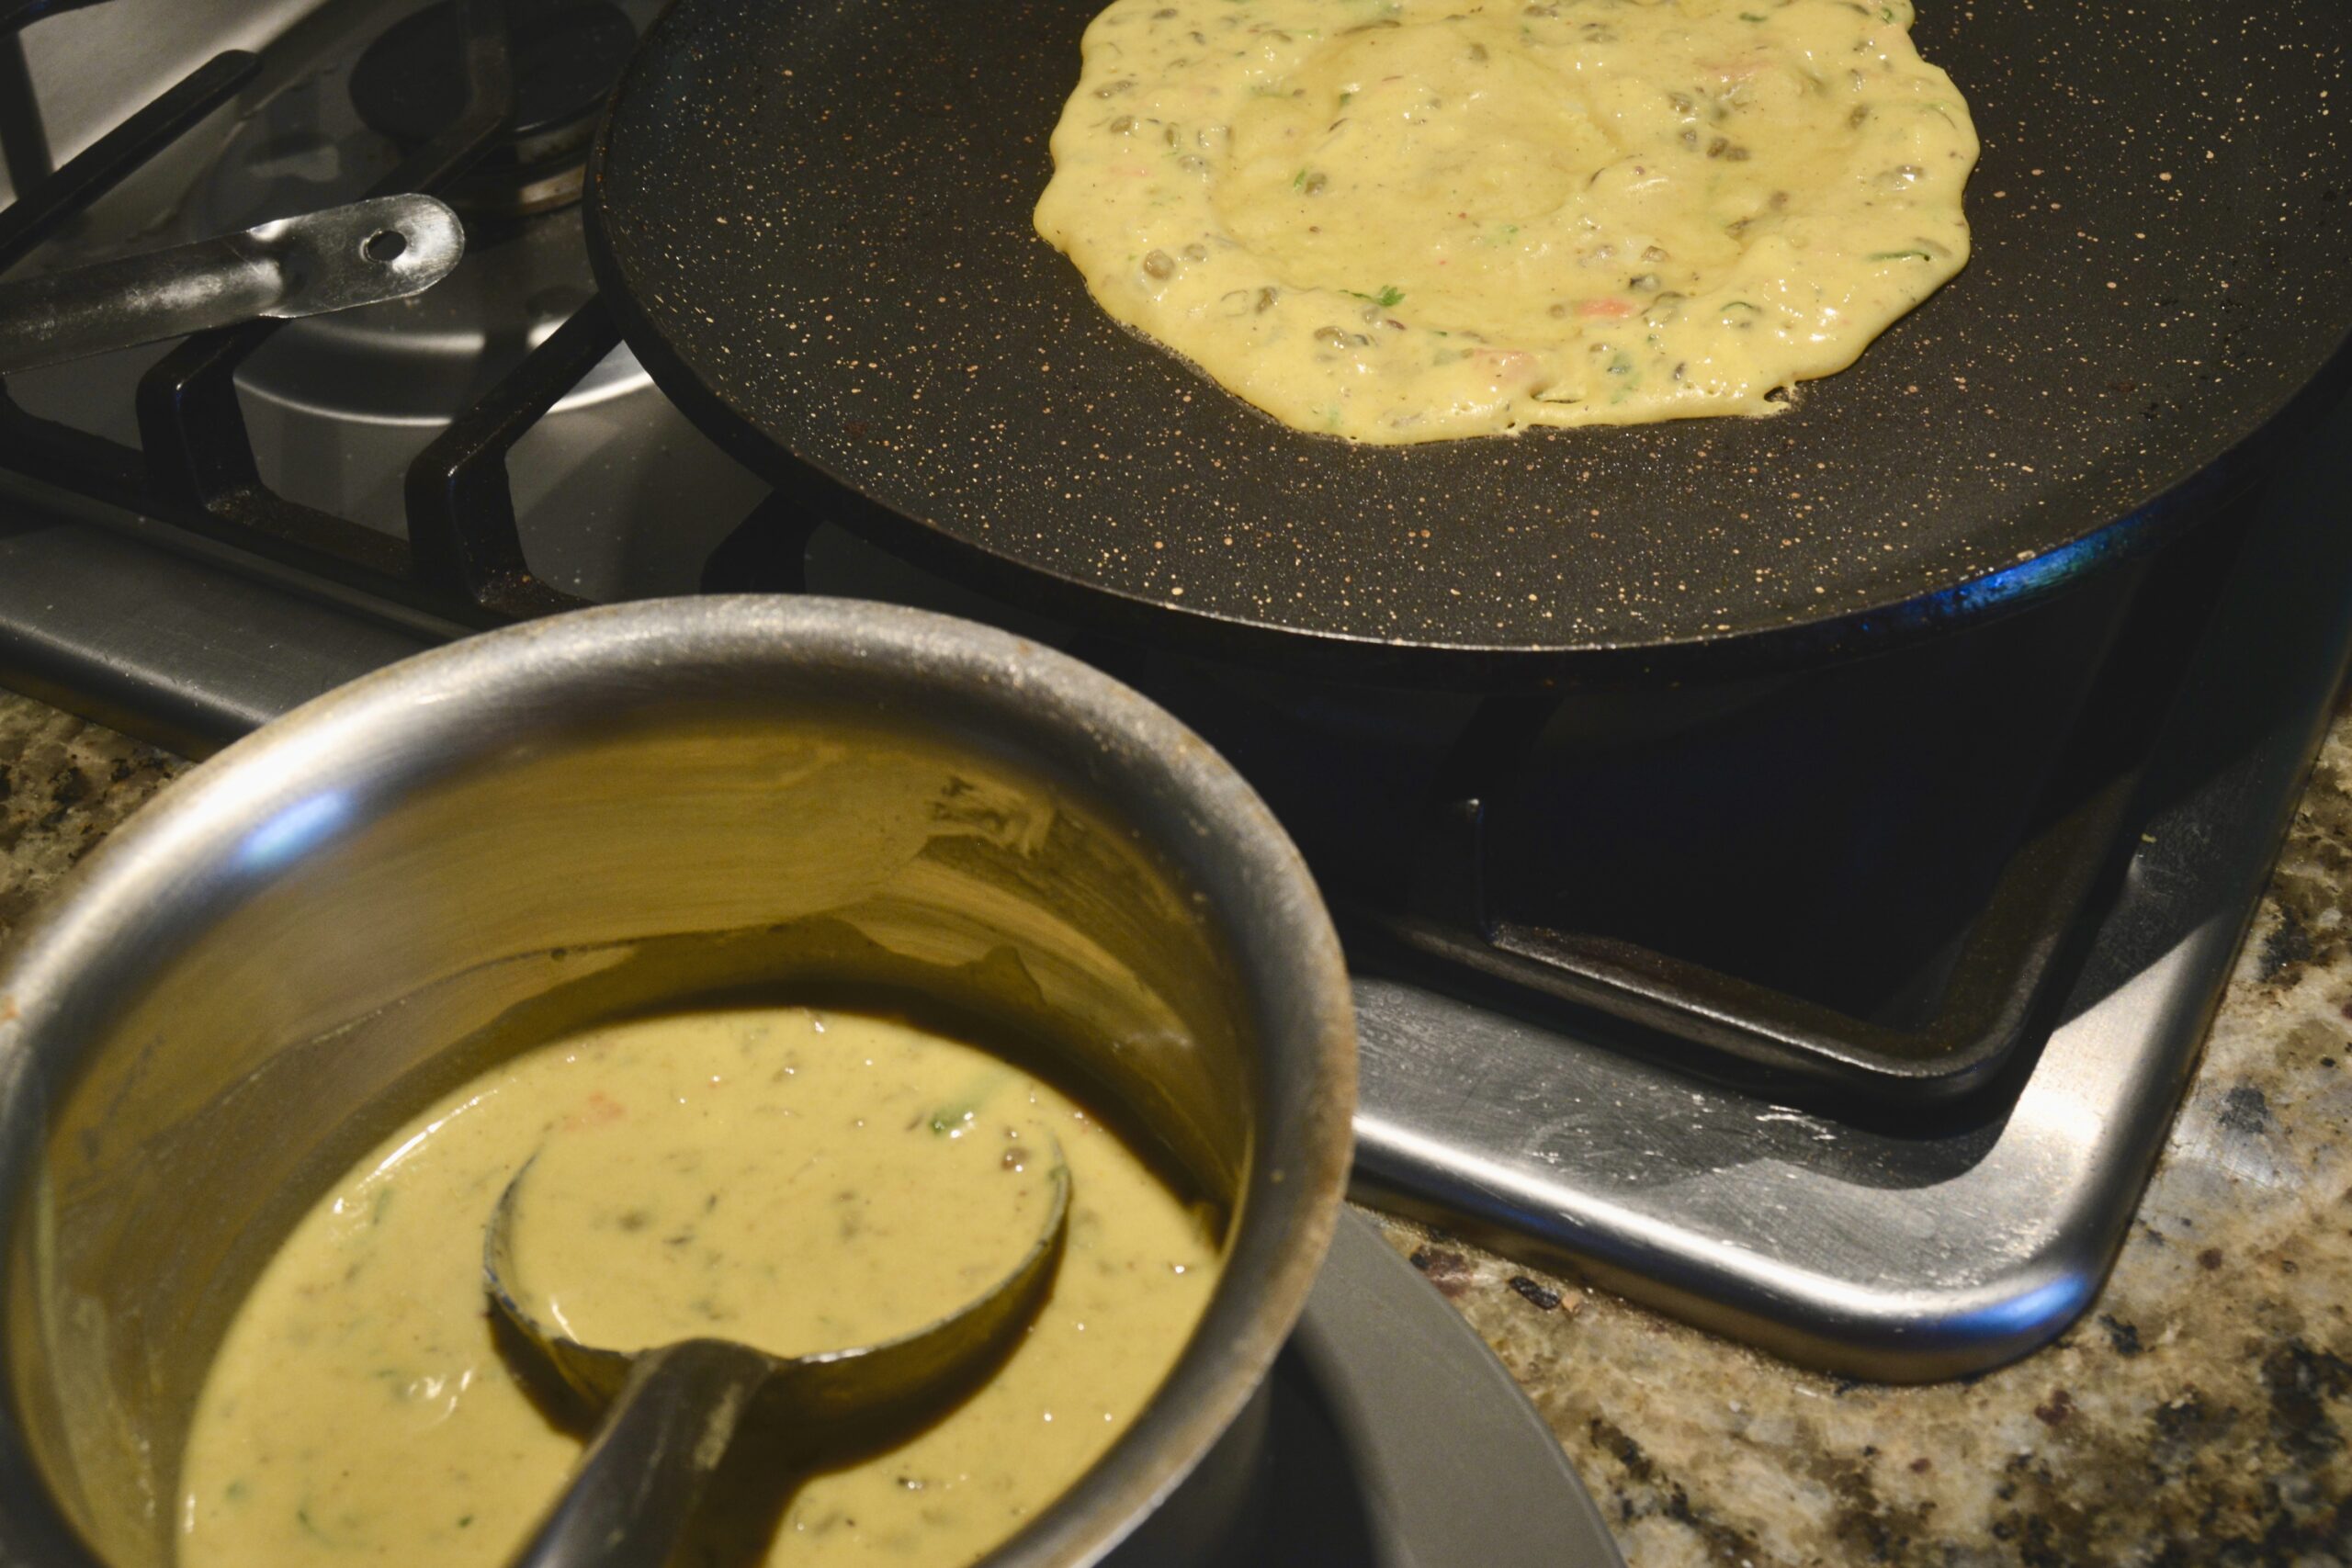
- Heat a nonstick griddle or broad frying pan over medium heat.
- Pour a ladle full or half a cup full of batter onto the hot griddle. Spread the batter around the pan in a quick circular motion with the back of a round metal to form a nice even pancake.
- Let cook for 2-3 minutes until the surface of the cheela starts to darken. Pour a teaspoonful of oil over and around the cheela. If you are not using a tava that has a natural slope to the center, pick up the pan and swirl the oil around a bit.
- When the edges start to brown, flip the cheela over and cook the other side the same way. If the pan seems too hot, lower the heat a bit.
- The pancakes should be well cooked with brown flecks. Lift with a spatula and place on a serving plate. I add a dollop of butter as it adds to the taste. You could also fold it in half before serving.
- Serve hot with any spicy chutney, tomato sauce, or salsa. I also like it with humus.
Notes
You can also add finely chopped or grated raw vegetables to the mix.
I sometimes like to add 1/4 cup of fresh or dried kasturi methi (ready-made dried fenugreek leaves).
For added protein, I will sometimes add a beaten egg.
To change things around I will add a half cup of leftover dal to the besan flour along with some chopped onions, green chilies (to taste), and cilantro. Just make sure the consistency is like pancake batter.
Enjoy!
")
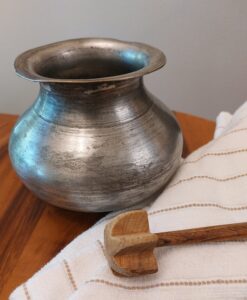 Indians, especially those from the northern plains of Punjab, love their white butter and ghee. It is generally fixed at home. The process involves churning fresh cream gathered over several days. The churning separates the water content, and pure butter is extracted. Some of this is melted down to obtain ghee.
I loved to churn the butter the old-fashioned way before the mechanical churners and blenders came along. All you needed was a clay pot (matki) or a metal pot for a churn and a wooden churner (mathni/ madhani). The churner stick was a round stick about a foot long, and at the end was a round-pronged wooden disc.
Fresh raw milk delivered by the milkman (doodhwala) was boiled, and the cream was gathered for several days. It was thick cream, and though refrigerated, you had to be careful it did not turn rancid before you churned it. A little curd would be added to the cream the night before to curdle it.
The cream would be poured into the churning pot and half-filled with cold or iced water. Then, placing your palms on opposite sides of the churner stick, you would maintain a steady sliding, back-and-forth motion to churn the soured cream.
Some pots came with a lid to prevent the liquid from splashing, but you could always cover a portion of the top with a dishcloth to prevent that from happening. It took a while, and you needed strong arms and patience to do it, but after a while, the cream would get thicker and thicker.
The fascinating part for me was to see the little blobs of butter start to separate from the whey and clump together. A few ice cubes added would help separate the whey further. When the butter was separated, you reached into the pot to skim the butter out with your fingers and poured it into a strainer or cheesecloth to drain the excess liquid.
A quick rinse with cold water and then gently squeeze the butter blob between your palms to remove more liquid before placing it in a dish. Your homemade white butter was ready for use. If my mother-in-law were around, she would ensure I rubbed the residual butter on my fingers over my palms and arms. She called it a home beauty treatment! Of course, I washed it off before I started smelling rancid!!
This unsalted homemade white butter, or safed makhan, tastes so good on fresh rotis, parathas, and bread. It is also made into pure ghee.
Milk bought in containers at the grocery stores is pasteurized and homogenized, so you do not get that thick layer of cream you get from boiling and cooling raw milk. I use whipping cream to fix white butter even though it has a lighter texture than the ones I made back home with the clotted cream I got from boiling the fresh raw milk. I have also melted this to fix ghee, but it takes longer to melt down, so I prefer unsalted butter.
Safed Makhan (White Butter)
A delicious, unsalted homemade white butter that tastes so good on fresh rotis, parathas, bread, and more!
Ingredients
- 1 8 oz heavy whipping cream
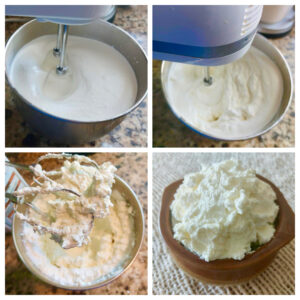
Instructions
- Pour the cream into a chilled deep bowl.
- Whip the cream on low speed for about 3 minutes until it thickens.
- Now, beat it on medium speed for another 8 minutes until it clumps together and forms butter.
- Pour into a dish, preferably with a lid.
- Tilt the dish and drain any residual whey. You get very little.
- Keep refrigerated.
Notes
 The butter should last about ten days in the refrigerator if pasteurized. Do a smell test to make sure it has not turned rancid! When I fix the butter from a heavy whipping cream, I melt it into ghee after 4-5 days to keep it safe.
If clotted cream is available at your grocery store, you could whip it up into white butter and then melt it down into ghee.
The butter should last about ten days in the refrigerator if pasteurized. Do a smell test to make sure it has not turned rancid! When I fix the butter from a heavy whipping cream, I melt it into ghee after 4-5 days to keep it safe.
If clotted cream is available at your grocery store, you could whip it up into white butter and then melt it down into ghee. ")
Dad is stationed in the town of Ajmer in the northwest of India. Ajayadeva, an 11th-century Rajput ruler, founded it. It surrounds the expansive lake of Ana Sagar and is surrounded in part by the Aravalli Hills range. Ajmer’s most historic landmark is the Sharif Dargah, considered among India’s holiest Muslim shrines. Khwaja Moin-ud-din-Chishti, a Sufi Saint from Persia, is enshrined there. Pilgrims worldwide visit to be blessed by the Khwaja and have their wishes and desires come true.
Ajmer is 8 miles from Pushkar, a town that hosts the Pushkar Mela (Fair). It is one of the world’s largest camel/cattle fairs. Like all fairs, it holds other attractions, amusements, local arts, crafts, and food. Multitudes descend on Pushkar to enjoy the fair. Pushkar Lake, located by the town, is a sacred lake to the Hindus.
Ajmer is different from the other towns we have lived in. It is a semi-desert, arid climate.
Dust storms precede the monsoon season—with its welcome rain and coolness from the heat. These dust storms kick up the dry earth and transport it with strong winds into every nook and cranny. It is like a sandstorm; you better get inside if you see it coming!
One such storm is on its way. The wind is picking up, and the sand blots out the sun. Mama calls out to us kids to shut all the doors and windows. We scramble. The dust storm hits and soon passes, followed by the sweet smell of rain. It is pretty heavy for the long-awaited monsoon season’s first rain. I can smell the dry earth soaking up the moisture. Since it is tea time, Mama has cook fix us pakoras to accompany evening tea. They are perfect for a rainy monsoon evening!
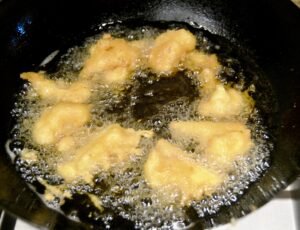
Pakoras (aka Bhajis) are deep-fried fritters or dumplings made with chickpea flour (besan). The chickpea flour used is the Indian small brown chickpea, not the garbanzo chickpea. You can fix pakoras with various vegetables such as potatoes, spinach, onions, zucchini, eggplant, cauliflower, cabbage, spinach, chilies, or a combination of vegetables. as well as paneer.
Pakoras can be made prepped in two ways. One, you dip the vegetable of your choice into the seasoned chickpea batter to coat, and then deep fry them.
The other method is to chop or grate a combination of vegetables. Add the chickpea flour and seasonings, and then deep fry them.
This recipe is the batter dipped and fried pakoras. Pakoras are served as snacks or appetizers, but generally a tea-time snack served with hot milky sweet chai.
Allu Pakoras (Savory Potato Fritters)
Pakoras(aka Bhajis) are deep-fried savory fritters or dumplings made with chickpea flour(besan).
Ingredients
- 2 cups potatoes (peeled and sliced not thicker than 1/4 inch)
- 1½ cup besan (gram flour)
- ¼ cup rice flour (optional)
- ½ tsp turmeric powder
- ½ tsp cumin powder
- ½ tsp chili powder (or to your taste)
- ⅛ tsp ajwain seeds (thymol or carom seeds)
- ⅛ tsp baking soda
- 1 tsp salt (or to your taste)
- ½-¾ cups water
- 2 cups oil (for deep frying—use an oil with a high smoke point like peanut or canola, safflower, or soybean)
- Dash chaat masala or black salt (available at any Indian grocery store)
Instructions
- In a mixing bowl, combine all the dry ingredients.
- Add a little water at a time and whisk until smooth. The consistency should coat the back of a spoon. You don't get delicious pakoras if the batter is too thin.
- Scrub, peel, wash, and slice the potatoes. Keep a bowl of water handy and place the cut potatoes in the bowl as you go along. Do not cut them too thin or too thick.
- Rinse again, drain, and pat dry with paper napkins or a kitchen towel, and place them in the chickpea batter. If you don't pat or drain them dry, the excess water will thin the batter, and the pakoras will end up with a thin layer of batter.
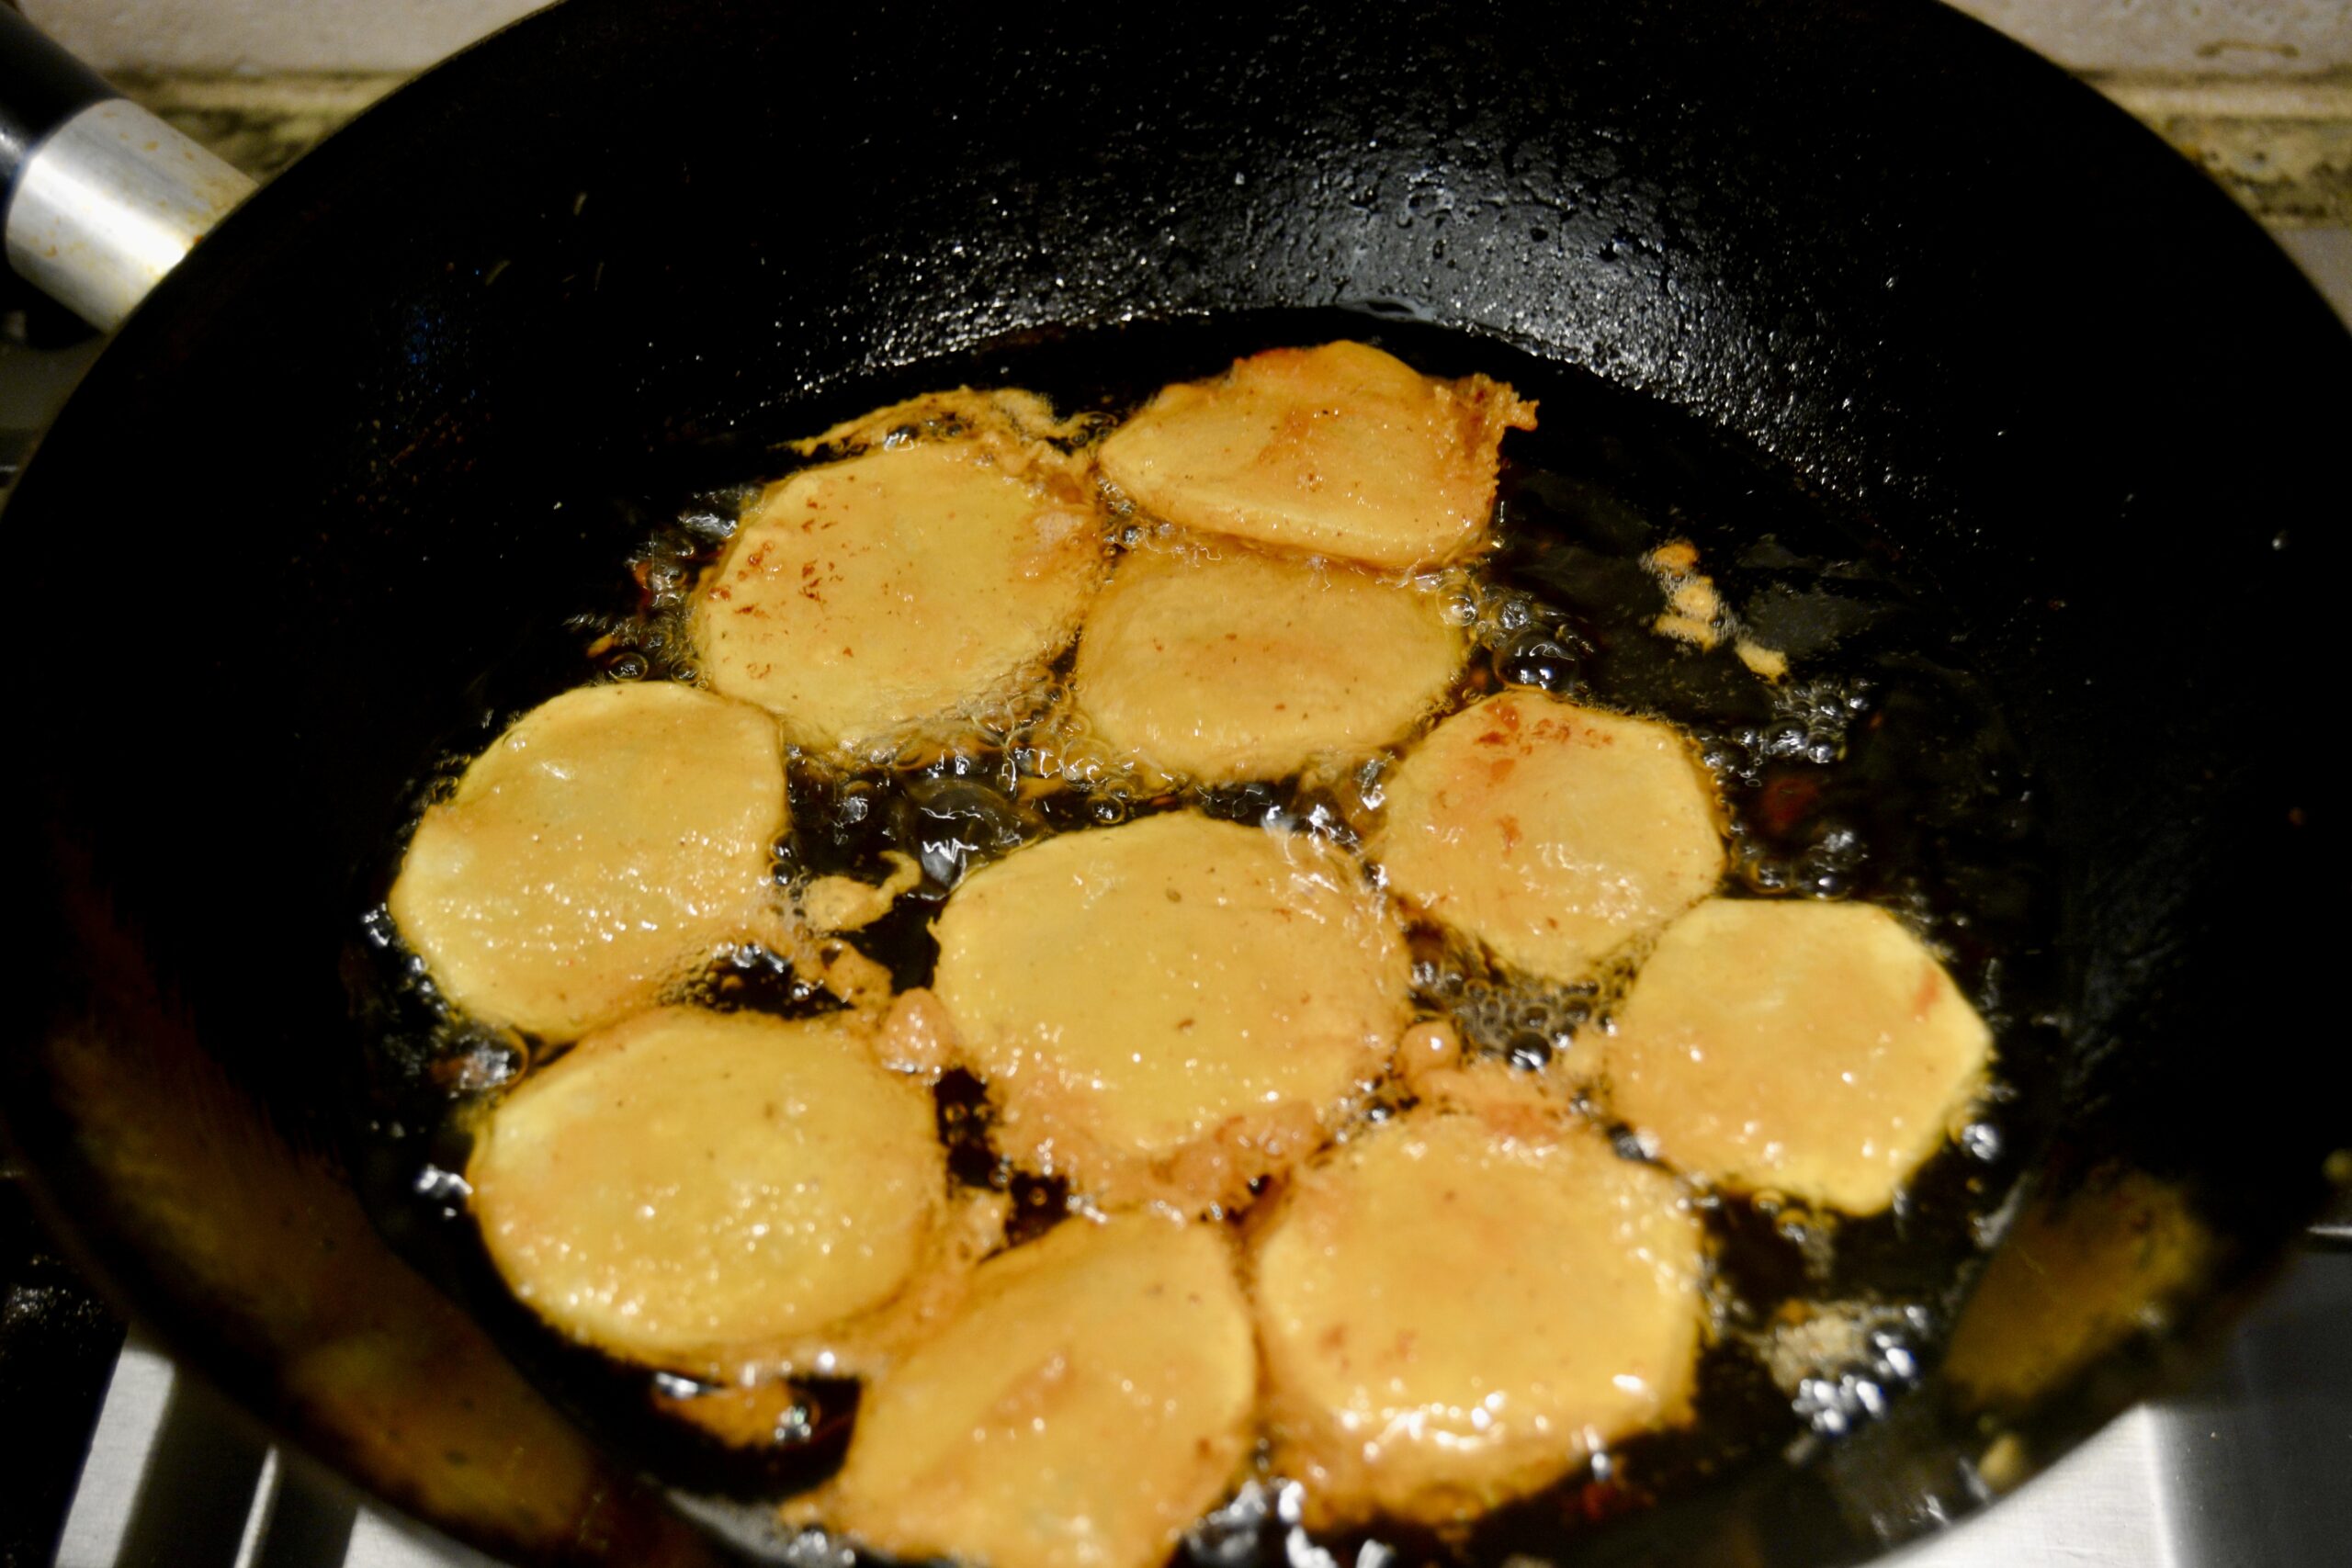
- Heat oil on medium-high heat in a deep wok or pan (approximately 350 degrees if you use a reading thermometer).
- When hot, carefully pick each slice of potatoes from the batter and slide them in slowly and carefully into the hot oil. You can use kitchen tongs to do this. I use my fingers, but you must be careful of the hot oil.
- Deep fry in batches on medium heat till golden brown. It takes about 4-5 minutes on each side.
- Remove with a slotted spoon or sieved spatula and drain on paper towels to absorb excess oil. If any crisp bits are floating around from the batter, remove those too before you put in the next batch to fry.
- Depending on how large your fryer is, it will take several batches. Do not crowd them in.
- Sprinkle chaat masala or black salt over the pakoras and toss gently.
- Place hot pakoras on a serving dish.
- Serve with mint chutney, tamarind chutney, tomato ketchup, or hot sauce.
Notes
Rice flour absorbs excess moisture, giving the pakoras a crispier finish.
You can also cut the potatoes in half and fix many varieties of them.
Pakora Variations
 Cauliflower Pakoras
Substitute the potatoes for cauliflower flowerets. Cut about 2 cups of the flowerets to about an inch or a little more in size. Slice lengthwise and in half again in case the pieces are too broad. Wash, pat dry, dip in batter, and fry. Turn gently after 3-4 minutes. Fry until you get a nice golden brown color—approximately 8 minutes.
Zucchini Pakoras
Wash two medium zucchini, pat dry, and slice into circles. Add to batter, coat each slice well, and deep fry in batches, slowly turning them around till golden brown. Approximately 6-7 minutes.
Eggplant Pakoras
Wash the eggplant and cut it into thin circles. If you use the large Black Beauty variety, you can cut the circles in half if they are too large. Wash and pat dry. Dip in batter and fry on medium-high heat till golden brown on both sides. Approximately 8-10 minutes.
Cauliflower Pakoras
Substitute the potatoes for cauliflower flowerets. Cut about 2 cups of the flowerets to about an inch or a little more in size. Slice lengthwise and in half again in case the pieces are too broad. Wash, pat dry, dip in batter, and fry. Turn gently after 3-4 minutes. Fry until you get a nice golden brown color—approximately 8 minutes.
Zucchini Pakoras
Wash two medium zucchini, pat dry, and slice into circles. Add to batter, coat each slice well, and deep fry in batches, slowly turning them around till golden brown. Approximately 6-7 minutes.
Eggplant Pakoras
Wash the eggplant and cut it into thin circles. If you use the large Black Beauty variety, you can cut the circles in half if they are too large. Wash and pat dry. Dip in batter and fry on medium-high heat till golden brown on both sides. Approximately 8-10 minutes.